データセットクラスを書いてみよう
ここでは、Chainerにすでに用意されているCIFAR10のデータを取得する機能を使って、データセットクラスを自分で書いてみます。Chainerでは、データセットを表すクラスは以下の機能を持っていることが必要とされます。
- データセット内のデータ数を返す
__len__メソッド - 引数として渡される
iに対応したデータもしくはデータとラベルの組を返すget_exampleメソッド
その他のデータセットに必要な機能は、chainer.dataset.DatasetMixinクラスを継承することで用意できます。ここでは、DatasetMixinクラスを継承し、Data augmentation機能のついたデータセットクラスを作成してみましょう。
[6]:
# Install Chainer and CuPy!

!curl https://colab.chainer.org/install | sh -
Reading package lists... Done
Building dependency tree
Reading state information... Done
libcusparse8.0 is already the newest version (8.0.61-1).
libnvrtc8.0 is already the newest version (8.0.61-1).
libnvtoolsext1 is already the newest version (8.0.61-1).
0 upgraded, 0 newly installed, 0 to remove and 1 not upgraded.
Requirement already satisfied: cupy-cuda80==4.0.0b3 from https://github.com/kmaehashi/chainer-colab/releases/download/2018-02-06/cupy_cuda80-4.0.0b3-cp36-cp36m-linux_x86_64.whl in /usr/local/lib/python3.6/dist-packages
Requirement already satisfied: numpy>=1.9.0 in /usr/local/lib/python3.6/dist-packages (from cupy-cuda80==4.0.0b3)
Requirement already satisfied: six>=1.9.0 in /usr/local/lib/python3.6/dist-packages (from cupy-cuda80==4.0.0b3)
Requirement already satisfied: fastrlock>=0.3 in /usr/local/lib/python3.6/dist-packages (from cupy-cuda80==4.0.0b3)
Requirement already satisfied: chainer==4.0.0b3 in /usr/local/lib/python3.6/dist-packages
Requirement already satisfied: filelock in /usr/local/lib/python3.6/dist-packages (from chainer==4.0.0b3)
Requirement already satisfied: six>=1.9.0 in /usr/local/lib/python3.6/dist-packages (from chainer==4.0.0b3)
Requirement already satisfied: protobuf>=3.0.0 in /usr/local/lib/python3.6/dist-packages (from chainer==4.0.0b3)
Requirement already satisfied: numpy>=1.9.0 in /usr/local/lib/python3.6/dist-packages (from chainer==4.0.0b3)
Requirement already satisfied: setuptools in /usr/lib/python3/dist-packages (from protobuf>=3.0.0->chainer==4.0.0b3)
1. CIFAR10データセットクラスを書く
[ ]:
import numpy as np
from chainer import dataset
from chainer.datasets import cifar

gpu_id = 0  # Set to -1 if you don't have a GPU

class CIFAR10Augmented(dataset.DatasetMixin):

    def __init__(self, train=True):
        train_data, test_data = cifar.get_cifar10()
        if train:
            self.data = train_data
        else:
            self.data = test_data
        self.train = train
        self.random_crop = 4

    def __len__(self):
        return len(self.data)

    def get_example(self, i):
        x, t = self.data[i]
        if self.train:
            x = x.transpose(1, 2, 0)
            h, w, _ = x.shape
            x_offset = np.random.randint(self.random_crop)
            y_offset = np.random.randint(self.random_crop)
            x = x[y_offset:y_offset + h - self.random_crop,
                  x_offset:x_offset + w - self.random_crop]
            if np.random.rand() > 0.5:
                x = np.fliplr(x)
            x = x.transpose(2, 0, 1)
        return x, t
このクラスは、CIFAR10のデータのそれぞれに対し、
- 32x32の大きさの中からランダムに28x28の領域をクロップ
- 1/2の確率で左右を反転させる
という加工を行っています。こういった操作を加えることで擬似的に学習データのバリエーションを増やすと、オーバーフィッティングを抑制することに役に立つということが知られています。これらの操作以外にも、画像の色味を変化させるような変換やランダムな回転、アフィン変換など、さまざまな加工によって学習データ数を擬似的に増やす方法が提案されています。
2. 作成したデータセットクラスを使って学習を行う
それではさっそくこのCIFAR10クラスを使って学習を行ってみましょう。先程使ったのと同じ大きなネットワークを使うことで、Data augmentationの効果がどの程度あるのかを調べてみましょう。train関数も含め、データセットクラス以外は先程使用したコードとほぼ同じになっています。異なるところはエポック数と、保存先ディレクトリ名だけです。
[8]:
import chainer
import chainer.functions as F
import chainer.links as L
from chainer.datasets import cifar
from chainer import iterators
from chainer import optimizers
from chainer import training
from chainer.training import extensions

class ConvBlock(chainer.Chain):

    def __init__(self, n_ch, pool_drop=False):
        w = chainer.initializers.HeNormal()
        super(ConvBlock, self).__init__()
        with self.init_scope():
            self.conv = L.Convolution2D(None, n_ch, 3, 1, 1,
                                 nobias=True, initialW=w)
            self.bn = L.BatchNormalization(n_ch)


        self.pool_drop = pool_drop

    def __call__(self, x):
        h = F.relu(self.bn(self.conv(x)))
        if self.pool_drop:
            h = F.max_pooling_2d(h, 2, 2)
            h = F.dropout(h, ratio=0.25)
        return h

class LinearBlock(chainer.Chain):

    def __init__(self):
        w = chainer.initializers.HeNormal()
        super(LinearBlock, self).__init__()
        with self.init_scope():
            self.fc = L.Linear(None, 1024, initialW=w)

    def __call__(self, x):
        return F.dropout(F.relu(self.fc(x)), ratio=0.5)

class DeepCNN(chainer.ChainList):

    def __init__(self, n_output):
        super(DeepCNN, self).__init__(
            ConvBlock(64),
            ConvBlock(64, True),
            ConvBlock(128),
            ConvBlock(128, True),
            ConvBlock(256),
            ConvBlock(256, True),
            LinearBlock(),
            LinearBlock(),
            L.Linear(None, n_output)
        )

    def __call__(self, x):
        for f in self.children():
            x = f(x)
        return x

def train(model_object, batchsize=64, gpu_id=gpu_id, max_epoch=20):

    # 1. Dataset
    train, test = CIFAR10Augmented(), CIFAR10Augmented(False)

    # 2. Iterator
    train_iter = iterators.SerialIterator(train, batchsize)
    test_iter = iterators.SerialIterator(test, batchsize, False, False)

    # 3. Model
    model = L.Classifier(model_object)
    if gpu_id >= 0:
            model.to_gpu(gpu_id)

    # 4. Optimizer
    optimizer = optimizers.Adam()
    optimizer.setup(model)

    # 5. Updater
    updater = training.StandardUpdater(train_iter, optimizer, device=gpu_id)

    # 6. Trainer
    trainer = training.Trainer(updater, (max_epoch, 'epoch'), out='{}_cifar10augmented_result'.format(model_object.__class__.__name__))

    # 7. Evaluator

    class TestModeEvaluator(extensions.Evaluator):

        def evaluate(self):
            model = self.get_target('main')
            ret = super(TestModeEvaluator, self).evaluate()
            return ret

    trainer.extend(extensions.LogReport())
    trainer.extend(TestModeEvaluator(test_iter, model, device=gpu_id))
    trainer.extend(extensions.PrintReport(['epoch', 'main/loss', 'main/accuracy', 'validation/main/loss', 'validation/main/accuracy', 'elapsed_time']))
    trainer.extend(extensions.PlotReport(['main/loss', 'validation/main/loss'], x_key='epoch', file_name='loss.png'))
    trainer.extend(extensions.PlotReport(['main/accuracy', 'validation/main/accuracy'], x_key='epoch', file_name='accuracy.png'))
    trainer.run()
    del trainer

    return model

model = train(DeepCNN(10), gpu_id=gpu_id, max_epoch=30)
epoch       main/loss   main/accuracy  validation/main/loss  validation/main/accuracy  elapsed_time
1           1.87873     0.317655       1.41017               0.461584                  43.0925
2           1.43628     0.473151       1.25639               0.578921                  86.7953
3           1.19476     0.575504       1.27879               0.557623                  130.447
4           1.05327     0.633923       0.920516              0.716959                  174.113
5           0.942941    0.674572       0.847574              0.732982                  217.801
6           0.863269    0.707166       0.774688              0.774383                  261.448
7           0.795316    0.733335       0.770755              0.744725                  305.051
8           0.732246    0.756502       0.672005              0.788217                  348.63
9           0.658229    0.78175        0.60823               0.800657                  392.607
10          0.620366    0.796595       0.542999              0.823945                  436.252
11          0.568625    0.81404        0.532844              0.826732                  479.816
12          0.536098    0.824744       0.477152              0.839968                  523.43
13          0.512311    0.831142       0.478048              0.843252                  567.054
14          0.483736    0.838788       0.47303               0.844049                  610.678
15          0.465534    0.849072       0.442802              0.854001                  654.255
16          0.444883    0.852273       0.392554              0.869228                  697.904
17          0.429       0.856338       0.429641              0.861565                  741.537
18          0.408273    0.865097       0.440374              0.857086                  785.204
19          0.403246    0.866217       0.418159              0.867735                  828.751
20          0.388374    0.872459       0.393507              0.866143                  872.362
21          0.380001    0.87456        0.364329              0.878085                  916.022
22          0.365747    0.879641       0.379309              0.87719                   959.659
23          0.362353    0.879942       0.355099              0.882066                  1003.22
24          0.346441    0.883223       0.364648              0.880872                  1046.85
25          0.338196    0.886429       0.365067              0.879877                  1090.47
26          0.328532    0.890805       0.379086              0.879976                  1134.01
27          0.326322    0.891525       0.359655              0.880175                  1177.64
28          0.311479    0.896507       0.347969              0.88744                   1221.18
29          0.312296    0.896459       0.342133              0.886346                  1264.76
30          0.303162    0.899728       0.391514              0.880872                  1308.4
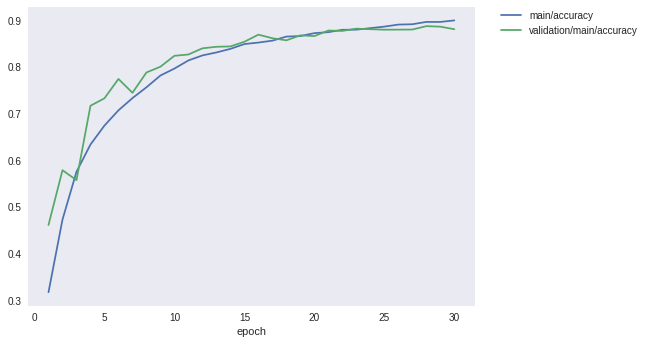
先程のData augmentationなしの場合は87%程度で頭打ちになっていた精度が、学習データにaugmentationを施すことで88%以上まで向上させられることが分かりました。1%強の改善です。
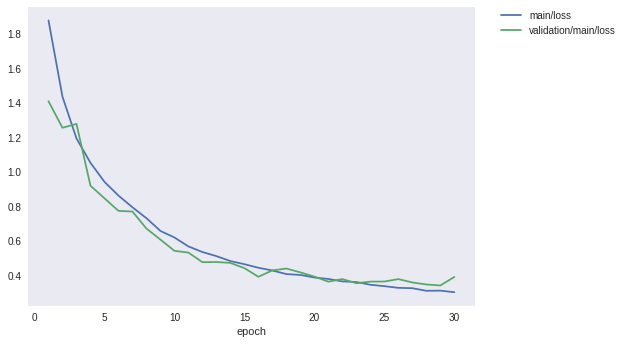
最後に、ロスと精度のグラフを見てみましょう。
[9]:
from IPython.display import Image
Image(filename='DeepCNN_cifar10augmented_result/loss.png')
[9]:
[10]:
Image(filename='DeepCNN_cifar10augmented_result/accuracy.png')
[10]: